“小桶”的版本间的差异
Monostardew(讨论 | 贡献) |
(→历史) 标签:移动版编辑 移动网页编辑 |
||
| (未显示21个用户的80个中间版本) | |||
| 第1行: | 第1行: | ||
{{Infobox | {{Infobox | ||
| − | | | + | |eng = Keg |
|source = [[打造]] | |source = [[打造]] | ||
| − | |recipe = {{name|耕种|等级8 | + | |recipe = {{name|Farming Skill Icon|link= 耕种|等级8}} |
|ingredients = {{name|Wood|30}}{{name|Copper Bar|1}}{{name|Iron Bar|1}}{{name|Oak Resin|1}} | |ingredients = {{name|Wood|30}}{{name|Copper Bar|1}}{{name|Iron Bar|1}}{{name|Oak Resin|1}} | ||
|sellprice = 不能出售 | |sellprice = 不能出售 | ||
| − | + | }} | |
| − | {{for| | + | {{for| 小桶盈利能力的详细分析|小桶生产力}} |
| − | |||
| − | + | '''小桶'''是一种用来制作[[工匠物品]]的[[ 打造#工匠设备|工匠设备]],打造配方在耕种等级8级时解锁。完成{{Bundle|Artisan||y}}后,可以获得一个作为奖励。4个 小桶 会作为[[镇长的庄园# 兑奖机| 兑奖机]] 的第19个奖品(50%概率)。 | |
| − | + | ||
| + | ==产品== | ||
| + | 注意:加工时间是近似值,因为从上午2点到6点的时间流速不同。正常情况下1小时 = 60分钟,但上午2点到6点的1小时 = 100分钟。一整天是 1600 分钟,其中白天是 1200 分钟,晚上是 400 分钟。 | ||
<section begin="kegproducts"/> | <section begin="kegproducts"/> | ||
| − | {| class="wikitable sortable | + | {|class="wikitable sortable roundedborder" |
| − | !class="unsortable" | | + | !class="unsortable" | 图片 |
| − | ! | + | ! 名称 |
| − | ! | + | ! 描述 |
| − | ! | + | ! 原料 |
| − | ! | + | ! 时间 |
| − | ! | + | ! 售价 |
| − | ! | + | ! 食用效果 |
|- | |- | ||
|[[File:Beer.png|center]] | |[[File:Beer.png|center]] | ||
| − | |[[ | + | |[[ 啤酒]] |
|{{Description|Beer}} | |{{Description|Beer}} | ||
|{{name|Wheat|1}} | |{{name|Wheat|1}} | ||
| − | |data-sort-value="01750"|{{Duration|1750 | + | |data-sort-value="01750"|{{Duration|1750 分钟 (1-2 天)|class=inline}} |
|{{price|200}} | |{{price|200}} | ||
| − | |{{energy|50}}{{health|22}} | + | |{{energy|50}}{{health|22}}{{name|Speed|-1}} |
|- | |- | ||
|[[File:Pale Ale.png|center]] | |[[File:Pale Ale.png|center]] | ||
| − | |[[ | + | |[[ 淡啤酒]] |
|{{Description|Pale Ale}} | |{{Description|Pale Ale}} | ||
|{{name|Hops|1}} | |{{name|Hops|1}} | ||
| − | |data-sort-value="02250"|{{Duration|2250 | + | |data-sort-value="02250"|{{Duration|2250 分钟 (1-2 天)|class=inline}} |
|{{price|300}} | |{{price|300}} | ||
| − | |{{energy|50}}{{health|22}} | + | |{{energy|50}}{{health|22}}{{name|Speed|-1}} |
|- | |- | ||
|[[File:Wine.png|center]] | |[[File:Wine.png|center]] | ||
| − | |[[ | + | |[[ 果酒]] |
|{{Description|Wine}} | |{{Description|Wine}} | ||
| − | | | + | | 任意[[ 水果]] (1) |
| − | |data-sort-value="10000"|{{Duration|10000 | + | |data-sort-value="10000"|{{Duration|10000 分钟 (≈7 天)|class=inline}} |
| − | |3 × [[ | + | |3 × [[ 水果]] 的基础价值 |
| − | |{{energy|50}}{{health|22}} | + | |{{energy|50}}{{health|22}}{{name|Speed|-1}} |
|- | |- | ||
|[[File:Juice.png|center]] | |[[File:Juice.png|center]] | ||
| − | |[[ | + | |[[ 果汁]] |
|{{Description|Juice}} | |{{Description|Juice}} | ||
| − | | | + | | 任意[[ 蔬菜]](1)或任何食用后恢复能量的[[采集#可采集物品| 可采集物品]] (除了蘑菇)(1) |
| − | |data-sort-value="06000"|{{Duration|6000 | + | |data-sort-value="06000"|{{Duration|6000 分钟 (≈4 天)|class=inline}} |
| − | |2.25 × [[ | + | |2.25 × [[ 蔬菜]] 的基础价值 |
|{{energy|75}}{{health|33}} | |{{energy|75}}{{health|33}} | ||
| + | |- | ||
| + | |- | ||
| + | |[[File:Green Tea.png|center]] | ||
| + | |[[绿茶]] | ||
| + | |{{Description|Green Tea}} | ||
| + | |{{name|Tea Leaves|1}} | ||
| + | |data-sort-value="00120"|{{Duration|180 分钟 (3 小时)}} | ||
| + | |{{price|100}} | ||
| + | |{{energy|13}}{{health|5}}{{name|Max Energy|+30}}{{name|Speed|+0.5}} | ||
|- | |- | ||
|[[File:Mead.png|center]] | |[[File:Mead.png|center]] | ||
| − | |[[ | + | |[[ 蜜蜂酒]] |
|{{Description|Mead}} | |{{Description|Mead}} | ||
|{{name|Honey|1}} | |{{name|Honey|1}} | ||
| − | |data-sort-value="00600"|{{Duration|600 | + | |data-sort-value="00600"|{{Duration|600 分钟 (10 小时)|class=inline}} |
| − | |{{price| | + | |{{price|300}} |
| − | |{{energy|75}}{{health|33}} | + | |{{energy|75}}{{health|33}}{{name|Speed|-1}} |
|- | |- | ||
|[[File:Coffee.png|center]] | |[[File:Coffee.png|center]] | ||
| − | |[[ | + | |[[ 咖啡]] |
|{{Description|Coffee}} | |{{Description|Coffee}} | ||
|{{name|Coffee Bean|5}} | |{{name|Coffee Bean|5}} | ||
| − | |data-sort-value="00120"|{{Duration|120 | + | |data-sort-value="00120"|{{Duration|120 分钟 (2 小时)}} |
|{{price|150}} | |{{price|150}} | ||
|{{energy|3}}{{health|1}}{{name|Speed|+1}} | |{{energy|3}}{{health|1}}{{name|Speed|+1}} | ||
| + | |- | ||
| + | |[[File:Vinegar.png|center]] | ||
| + | |[[醋]](2) | ||
| + | |{{Description|Vinegar}} | ||
| + | |{{name|Rice|1}} | ||
| + | |data-sort-value="0600"|{{Duration|600分钟 (10 小时)}} | ||
| + | |{{price|100}} | ||
| + | |data-sort-value="13"|{{energy|13}}{{health|5}} | ||
| + | |- | ||
|}<section end="kegproducts"/> | |}<section end="kegproducts"/> | ||
| − | == | + | == [[ 罐头瓶]] vs. [[ 小桶]] == |
| − | + | :另见:[[罐头瓶 生产力]], [[小桶生产力]] | |
| + | 从原料类型上区分,罐头瓶可以加工水果、蔬菜和鱼籽,而小桶可以加工水果、蔬菜、咖啡豆、蜂蜜和茶叶。在加工水果和蔬菜时,由于价格公式的不同,二者在加工利润方面有所区别。 | ||
| + | 使用[[罐头瓶]]加工的增值公式为:(2 × 基础[[农作物]]价格+ 50 ); 而[[小桶]]则是将[[ 水果]] 的基础价格 × 3 ,[[ 蔬菜]] 价格 × 2.25 。因此,如[[ 玉米]] 或[[ 西红柿]] 等低价值、高产量作物放入罐头瓶加工会更有价值。而小桶则更合适售价较高的作物,如[[ 上古水果]] 或[[ 甜瓜]] 。二者的平衡点,对于水果是{{price|50}},对于蔬菜是{{price|200}}。下面是一个放小桶加工会更有价值(仅从单价来看)的作物列表,列出了作物的基础价格。'''粗体字'''标识出来的作物基础售价超过{{price|200}}。 | ||
| − | + | {|class="wikitable roundedborder" | |
| − | |||
| − | {|class="wikitable | ||
|- | |- | ||
| − | ![[ | + | ![[ 水果]] |
| − | ![[ | + | ![[ 蔬菜]] |
|- | |- | ||
| | | | ||
| − | *'''{{Name|Ancient Fruit| | + | *'''{{Name|Ancient Fruit|550金}}''' |
*{{Name|Apple|100金}} | *{{Name|Apple|100金}} | ||
*{{Name|Cactus Fruit|75金}} | *{{Name|Cactus Fruit|75金}} | ||
| 第97行: | 第116行: | ||
*'''{{Name|Starfruit|750金}}''' | *'''{{Name|Starfruit|750金}}''' | ||
*{{Name|Strawberry|120金}} | *{{Name|Strawberry|120金}} | ||
| − | |||
| | | | ||
*'''{{Name|Pumpkin|320金}}''' | *'''{{Name|Pumpkin|320金}}''' | ||
*'''{{Name|Red Cabbage|260金}}''' | *'''{{Name|Red Cabbage|260金}}''' | ||
| − | *'''{{Name|Hops|class=inline}}''' (25金 | + | *'''{{Name|Hops|class=inline}}''' (25金 ,但是淡啤酒售价300 金) |
| − | *'''{{Name|Wheat|class=inline}}''' (25金 | + | *'''{{Name|Wheat|class=inline}}''' (25金 ,但是啤酒售价200 金) |
|} | |} | ||
| − | + | 注意,上述计算只考虑了最大利润方面;如果根据所需加工时间来看每日盈利,无论作物基础价值如何,[[罐头瓶]] 的盈利效率始终超过 [[小桶]],因为罐头瓶的加工速度要快得多。尽管如此,在游戏的第一年,考虑到制造材料的成本,实际上小桶比罐头瓶更适合大规模生产。如果木材、石头、矿石和煤炭全部从 [[木匠的商店]] 和 [[铁匠铺]] 购买,1个小桶的制造成本为1725金加1个 [[橡树树脂]](不包括 [[树液采集器]] 的成本),而1个罐头瓶的制造成本为2500金<ref name="cost" />。如果不购买材料,游戏中获取木材比石头容易,获取树脂比煤炭容易得多(使用 [[树肥]] 种橡树)。另外,[[啤酒花]] 是第一年收益最高的作物,[[淡啤酒]] 只能用小桶加工。 | |
| − | == | + | == 存放小桶的方案== |
| − | === | + | === 在农场建筑内=== |
| − | + | 玩家可在农场建筑内放置小桶。 | |
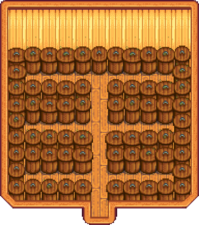
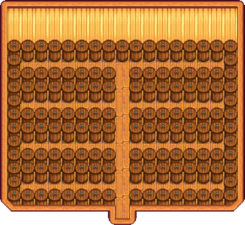
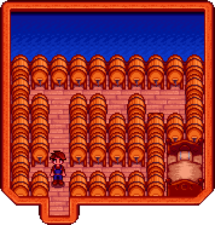
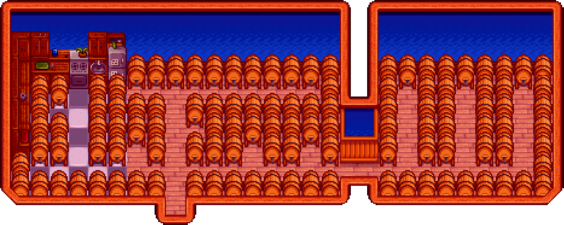
| + | * [[小屋]]占地21格,最优方案下可放置67个小桶。升级为大屋子后,占地不变,最优方案下可放置137个小桶。 | ||
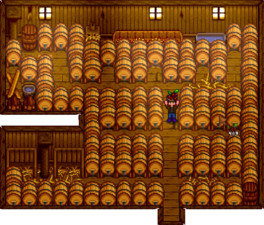
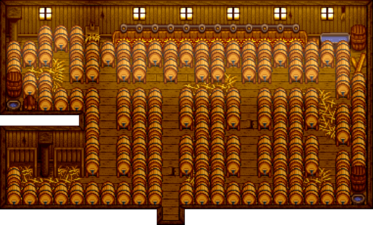
| + | * [[畜棚]]占地28格,相较小屋造价更低,并且最多可放置90个小桶。升级为高级畜棚后,占地和畜棚一致,最多可放置136个小桶,但建造成本相当高。 | ||
| + | * [[ 鸡舍]] 造价较低,但是可用的空间非常有限,甚至不如直接放置在室外。 | ||
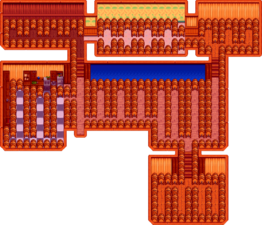
| + | * [[ 联机小屋]] 造价最低,在无人入住并且必须保留床和初始赠送的防风草种子的情况下,联机小屋只占地15格,无需升级就能够放置42个小桶;第一次升级后,联机小屋能够放置113个小桶,在各个方案中成本最优;第二次升级后,联机小屋能够放置352个小桶,但建造的成本也显著提高。 | ||
<gallery mode="packed" heights="150px"> | <gallery mode="packed" heights="150px"> | ||
| − | File:Optimal shed layout.png|Optimal shed layout | + | File:Optimal shed layout.png| 小屋可放置67个设备 |
| − | Kegs in Small Barn x90.png| | + | Optimal big shed layout.png|大屋子可放置137个设备 |
| − | File: | + | Kegs in Small Barn x90.png| 畜棚可放置90个设备 |
| + | File:Stardew deluxe barn 136 kegs.png| 高级畜棚可放置136个设备 | ||
</gallery> | </gallery> | ||
| − | |||
| − | |||
| − | |||
<gallery mode="packed" heights="150px"> | <gallery mode="packed" heights="150px"> | ||
| − | File:254Kegs Quarry.png| | + | Cabin upgrade 0 no player 42 kegs.png|联机小屋可放置42个设备 |
| − | File: | + | Cabin upgrade 1 no bed 113 kegs.png|升级一次后,联机小屋可放置113个设备 |
| − | File: | + | Cabin upgrade 2 no cellar 351 kegs.png|升级两次后,联机小屋可放置351个设备 |
| + | </gallery> | ||
| + | |||
| + | ===在农场外面=== | ||
| + | :另见:[[打造#在农场屋外打造|在农场屋外打造]] | ||
| + | 小桶可以被放置在农场外的大多地方。在某些地方可能会因为NPC人物路过而遭到破坏。在[[沙漠]] 和 [[铁路]]暂没有图片来展示较好的方案。 | ||
| + | <gallery mode="packed"> | ||
| + | File:254Kegs Quarry.png| 在 [[ 采石场]] 可放置374个小桶。 | ||
| + | File:Tunnel 131 Kegs.png| 在[[ 隧道]] 中可放置131个小桶。 | ||
| + | File:90 Kegs Road.png| 在[[ 隧道| 路边]] 可放置90个小桶。其中两个在隧道中未显示。 | ||
</gallery> | </gallery> | ||
| − | == | + | == 参考 == |
| − | + | <references> | |
| + | <ref name="cost">小桶的制造材料为30木材,1铜锭,1铁锭,1橡树树脂,购买材料需要 (10*30 + 75*5 + 150*1 + 150*5 + 150*1) = 1725金。罐头瓶的制造材料为50木材,40石头,8煤炭,购买材料需要 (10*50 + 20*40 + 150*8) = 2500金。</ref> | ||
| + | </references> | ||
| − | == | + | == 历史== |
| − | {{ | + | {{History|1.0| 加入游戏。}} |
| − | {{ | + | {{History|1.1|从制作配方中移除[[粘土]]。}} |
| + | {{History|1.4|加入[[绿茶]]。调整加工时间,使机器仅从上午2点到6点每小时处理时间计为100分钟,而不是玩家睡着的每个小时都计为100分钟。现在小桶可堆叠了。}} | ||
| + | {{History|1.6| 现在可以在小桶中把一份[[大米]]加工成两份[[ 醋]] 。现在[[镇长的庄园#兑奖机|兑奖机]]会奖励小桶。}} | ||
| + | {{history|1.6.4|现在一些野生采集品也可放入小桶中制成[[果汁]]。}} | ||
{{NavboxEquipment}} | {{NavboxEquipment}} | ||
| 第140行: | 第174行: | ||
[[en:Keg]] | [[en:Keg]] | ||
[[es:Barril]] | [[es:Barril]] | ||
| + | [[fr:Tonneau]] | ||
| + | [[it:Barilotto]] | ||
[[ja:醸造ダル]] | [[ja:醸造ダル]] | ||
| + | [[ko:술통]] | ||
| + | [[hu:Keghordó]] | ||
[[pt:Barril]] | [[pt:Barril]] | ||
[[ru:Бочонок]] | [[ru:Бочонок]] | ||
| + | [[tr:Fıçı]] | ||
2024年6月17日 (一) 17:45的最新版本
- 关于小桶盈利能力的详细分析,请查看:小桶生产力。
小桶是一种用来制作工匠物品的工匠设备,打造配方在耕种等级8级时解锁。完成茶水间的![]() 工匠收集包后,可以获得一个作为奖励。4个小桶会作为兑奖机的第19个奖品(50%概率)。
工匠收集包后,可以获得一个作为奖励。4个小桶会作为兑奖机的第19个奖品(50%概率)。
产品
注意:加工时间是近似值,因为从上午2点到6点的时间流速不同。正常情况下1小时 = 60分钟,但上午2点到6点的1小时 = 100分钟。一整天是 1600 分钟,其中白天是 1200 分钟,晚上是 400 分钟。
| 图片 | 名称 | 描述 | 原料 | 时间 | 售价 | 食用效果 |
|---|---|---|---|---|---|---|
| 啤酒 | 请适度饮酒。 | |||||
| 淡啤酒 | 请适度饮酒。 | |||||
| 果酒 | 请适度饮酒。 | 任意水果(1) | 3 × 水果的基础价值 | |||
| 果汁 | 一种甜润,富含营养的饮料。 | 任意蔬菜(1)或任何食用后恢复能量的可采集物品(除了蘑菇)(1) | 2.25 × 蔬菜的基础价值 | |||
| 绿茶 | 由轻加工的茶叶制成的令人愉快的提神饮料。 | |||||
| 蜜蜂酒 | 蜂蜜制成的发酵饮料。适度饮用。 | |||||
| 咖啡 | 闻上去就很好喝。它肯定能让你充满活力。 | |||||
| 醋(2) | 酿造过的酸性液体,许多配方中都会用到。 |
罐头瓶 vs. 小桶
从原料类型上区分,罐头瓶可以加工水果、蔬菜和鱼籽,而小桶可以加工水果、蔬菜、咖啡豆、蜂蜜和茶叶。在加工水果和蔬菜时,由于价格公式的不同,二者在加工利润方面有所区别。
使用罐头瓶加工的增值公式为:(2 × 基础农作物价格+ 50); 而小桶则是将水果的基础价格 × 3,蔬菜价格 × 2.25。因此,如玉米或西红柿等低价值、高产量作物放入罐头瓶加工会更有价值。而小桶则更合适售价较高的作物,如上古水果或甜瓜。二者的平衡点,对于水果是![]() 50金,对于蔬菜是
50金,对于蔬菜是![]() 200金。下面是一个放小桶加工会更有价值(仅从单价来看)的作物列表,列出了作物的基础价格。粗体字标识出来的作物基础售价超过
200金。下面是一个放小桶加工会更有价值(仅从单价来看)的作物列表,列出了作物的基础价格。粗体字标识出来的作物基础售价超过![]() 200金。
200金。
| 水果 | 蔬菜 |
|---|---|
注意,上述计算只考虑了最大利润方面;如果根据所需加工时间来看每日盈利,无论作物基础价值如何,罐头瓶 的盈利效率始终超过 小桶,因为罐头瓶的加工速度要快得多。尽管如此,在游戏的第一年,考虑到制造材料的成本,实际上小桶比罐头瓶更适合大规模生产。如果木材、石头、矿石和煤炭全部从 木匠的商店 和 铁匠铺 购买,1个小桶的制造成本为1725金加1个 橡树树脂(不包括 树液采集器 的成本),而1个罐头瓶的制造成本为2500金[1]。如果不购买材料,游戏中获取木材比石头容易,获取树脂比煤炭容易得多(使用 树肥 种橡树)。另外,啤酒花 是第一年收益最高的作物,淡啤酒 只能用小桶加工。
存放小桶的方案
在农场建筑内
玩家可在农场建筑内放置小桶。
- 小屋占地21格,最优方案下可放置67个小桶。升级为大屋子后,占地不变,最优方案下可放置137个小桶。
- 畜棚占地28格,相较小屋造价更低,并且最多可放置90个小桶。升级为高级畜棚后,占地和畜棚一致,最多可放置136个小桶,但建造成本相当高。
- 鸡舍造价较低,但是可用的空间非常有限,甚至不如直接放置在室外。
- 联机小屋造价最低,在无人入住并且必须保留床和初始赠送的防风草种子的情况下,联机小屋只占地15格,无需升级就能够放置42个小桶;第一次升级后,联机小屋能够放置113个小桶,在各个方案中成本最优;第二次升级后,联机小屋能够放置352个小桶,但建造的成本也显著提高。
小屋可放置67个设备
大屋子可放置137个设备
畜棚可放置90个设备
高级畜棚可放置136个设备


联机小屋可放置42个设备
升级一次后,联机小屋可放置113个设备
升级两次后,联机小屋可放置351个设备


在农场外面
- 另见:在农场屋外打造
小桶可以被放置在农场外的大多地方。在某些地方可能会因为NPC人物路过而遭到破坏。在沙漠 和 铁路暂没有图片来展示较好的方案。


参考
- ↑ 小桶的制造材料为30木材,1铜锭,1铁锭,1橡树树脂,购买材料需要 (10*30 + 75*5 + 150*1 + 150*5 + 150*1) = 1725金。罐头瓶的制造材料为50木材,40石头,8煤炭,购买材料需要 (10*50 + 20*40 + 150*8) = 2500金。
历史
- 1.0:加入游戏。
- 1.1:从制作配方中移除粘土。
- 1.4:加入绿茶。调整加工时间,使机器仅从上午2点到6点每小时处理时间计为100分钟,而不是玩家睡着的每个小时都计为100分钟。现在小桶可堆叠了。
- 1.6:现在可以在小桶中把一份大米加工成两份醋。现在兑奖机会奖励小桶。
- 1.6.4:现在一些野生采集品也可放入小桶中制成果汁。
| 设备 | ||
|---|---|---|
| 工匠 | 蜂房 • 木桶 • 压酪机 • 小桶 • 织布机 • 蛋黄酱机 • 产油机 • 罐头瓶 • 烘干机 • 熏鱼机 | |
| 精炼 | 煤炭窑 • 宝石复制机 • 熔炉 • 重型熔炉 • 避雷针 • 回收机 • 种子生产器 • 史莱姆压蛋器 • 史莱姆孵化器 • 树液采集器 • 碎木机 • 虫饵盒 • 高级虫饵盒 • 鱼饵制造机 • 重型树液采集器 • 太阳能板 • 鸵鸟孵化器 • 碎骨机 • 晶球破开器 • 蘑菇树桩 | |
| 耕种 | 肥料 | 初级肥料 • 高级肥料 • 顶级肥料 • 初级保湿土壤 • 高级保湿土壤 • 顶级保湿土壤 • 生长激素 • 高级生长激素 • 顶级生长激素 • 树肥 |
| 洒水器 | 铱制洒水器 • 优质洒水器 • 洒水器 | |
| 其他 | 稻草人 • 稀有稻草人 • 豪华稻草人 • 花盆 | |
| 钓鱼 | 鱼饵 | 鱼饵 • 磁铁 • 万能鱼饵 • 高级鱼饵 • 挑战鱼饵 • 魔法鱼饵 • 针对性鱼饵 |
| 渔具 | 倒刺钩 • 软木塞浮标 • 精装旋式鱼饵 • 铅制浮标 • 旋式鱼饵 • 陷阱浮标 • 寻宝者 • 声纳浮漂 • 优质浮标 • 珍稀诱钩 | |
| 其他 | 蟹笼 | |
| 炸弹 | 樱桃炸弹 • 炸弹 • 超级炸弹 | |
| 围栏 | 大门 • 硬木围栏 • 铁围栏 • 石围栏 • 木围栏 | |
| 存储 | 宝箱 • 祝尼魔箱 • 迷你冰箱 • 石箱 • 大箱子 • 石制大箱子 | |
| 标牌 | 深色牌子 • 石牌 • 木牌 • 文字标牌 | |
| 杂项 | 楼梯 • 工具 • 工作台 • 咖啡机 • 野炊工具 • 仙尘 • 农场电脑 • 加料器 • 迷你点唱机 • 缝纫机 • 电话 • 便携帐篷 • 分解机 • 迷你出货箱 • 迷你锻造台 • 铁砧 • 祝福雕像 • 矮人之王雕像 | |