模组:IDE 参考
1059 Studio(讨论 | 贡献)2021年4月14日 (三) 09:07的版本
←目录

|
不完整的翻译 本文或部分尚未完全翻译成中文。
欢迎您通过编辑帮助其建设。 |
此页面描述了如何使用 Visual Studio 2019 或 MonoDevelop/Visual Studio for Mac 来制作 SMAPI 模组。参阅在主页面中的 创建 SMAPI 模组
在你开始之前
- 安装 Visual Studio Community (Windows)、MonoDevelop (Linux)、Visual Studio for Mac (Mac)
- 你应该具备 C# 入门基础
- 以下是一些需要记住的基本术语:
term definition IDE 开发环境,就是现在你的 Visual Studio 或 MonoDevelop DLL .dll 后缀的文件(全称叫 动态链接库,英文 Dynamic Link Library),文件包括了你的代码,SMAPI 将加载的东西 项目 每个项目在生成(编译,或者说是构建)的时候都会生成独立的文件 解决方案 项目的集合,每一个工程可以包含多个项目。所谓的工程也称为解决方案,可以理解为要解决问题的方案,可能听起来有点奇怪,不过这是专业术语
创建一个模组项目
在编写模组的代码之前,需要创建一个解决方案和一个包含它的项目
Windows (Visual Studio 2019)
- 打开 Visual Studio 2019.
- 点击 创建新项目
File:Modding - IDE reference - create project (Visual Studio 1) - ZH.png - 筛选器选择语言 C# 和 库,然后选择 类库(.NET Framework),点击 下一步。确保你选择了正确的选项,否则是不会起作用的
File:Modding - IDE reference - create project (Visual Studio 2) - ZH.png - 在 配置新项目 窗口中:
- 输入你的模组名称。按照约定,名称应该是一个由几个单词去除空格连起来的字符串(例如 MyNewMod,避免使用特殊字符,如果实在看不习惯可以用下划线来代替空格。可以使用中文,不过这会让其他国家的玩家感到困惑,所以为了便于在国际上交流请尽可能避免使用中文)。
- 取消勾选 将解决方案和项目放在同一目录中
- 确保选择的是 .NET Framework 4.5.2
- 点击 创建 来创建项目
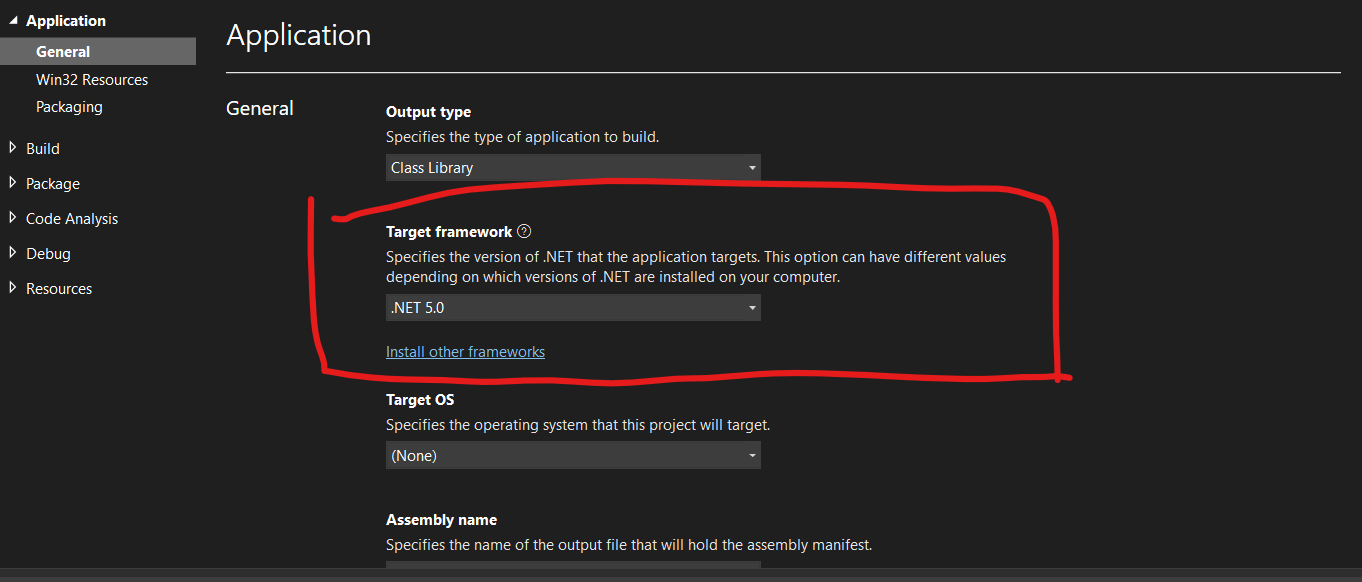
Set the target framework
The 'target framework' is the version of .NET Framework your code uses, which affects the version needed to run your mod. The recommended target framework is .NET Framework 4.5, which is the version SMAPI itself targets.
In Visual Studio 2017
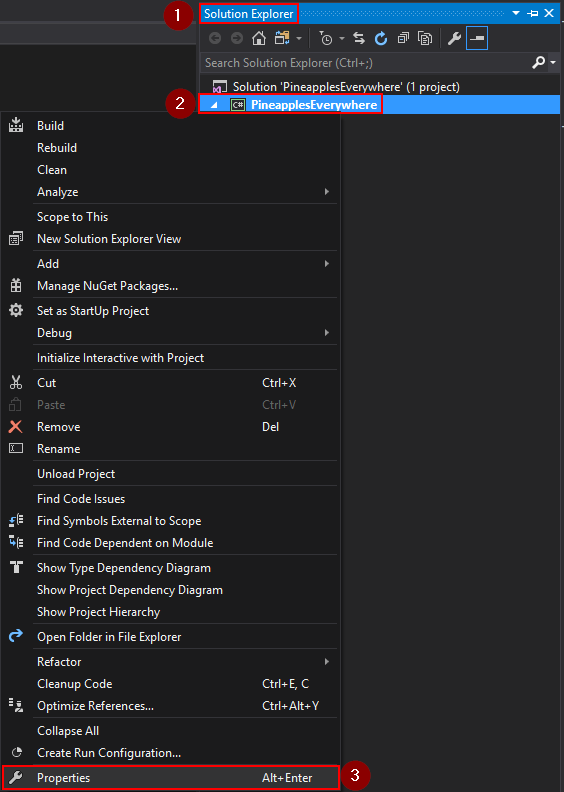
- Open the Solution Explorer pane. If it's not visible, click View » Solution Explorer from the menu:

- From the Solution Explorer, right-click on the project and choose Properties:
- On the Application tab, change the Target Framework dropdown to .NET Framework 4.5:
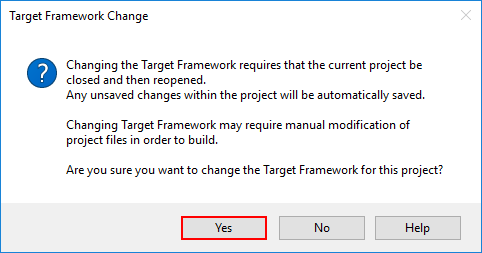
- A dialogue may appear asking you to confirm the change. Click 'Yes' to confirm:
.png)
.png)
.png)
.png)
_-_ZH.png)
_-_ZH.png)
_-_ZH.png)