“模组:Content Patcher”的版本间的差异
1059 Studio(讨论 | 贡献) (建立内容为“← {{模组:目录|目录}} {{翻译}} 想为游戏创建内容包模组吗?教程就在这里。'''有关如何使用模组,请参阅 模组:使用指…”的新页面) |
1059 Studio(讨论 | 贡献) |
||
| 第1行: | 第1行: | ||
| − | ← | + | ← [[ 模组:目录|目录]] |
{{翻译}} | {{翻译}} | ||
2021年4月16日 (五) 00:45的版本
← 目录

|
不完整的翻译 本文或部分尚未完全翻译成中文。
欢迎您通过编辑帮助其建设。 |
想为游戏创建内容包模组吗?教程就在这里。有关如何使用模组,请参阅 模组:使用指南/入门
快速开始
此页面是对创建 Content Patcher 的内容包的简要介绍。如果你不需要介绍,请参阅 完整的技术资料
基本概念
什么是 Content Patcher ?
Content Patcher是一种 SMAPI 模组,可更改游戏资源(图像、对话、数据和地图),而无需替换游戏文件或编写代码。可以通过创建包含几个 JSON 文件(基本上是文本)的内容包(基本上是文件夹)来使用它。只需编辑 JSON 文件就可以:
- 替换一个图像文件
- 制作季节性的变化
- 根据天气、日期、与其他 NPC 的关系等进行更改
- 进行非常具体的更改(例如,在完成乔家超市献祭之后,在下雪的冬天的周末,咖啡价格会更高)
- 以及更多
资源 Assets
一个 asset 本质上是游戏中的 Content 文件夹,具有唯一的“资源名称”。 资产名称从不包含 Content路径、语言或文件扩展名(可以使用令牌来定位特定的语言)。例如:
| 文件 | 资源名称 |
|---|---|
| Content/Portraits/Abigail.xnb | Portraits/Abigail |
| Content/Maps/spring_beach.xnb Content/Maps/spring_beach.es-ES.xnb Content/Maps/spring_beach.fr-FR.xnb |
Maps/spring_beach |
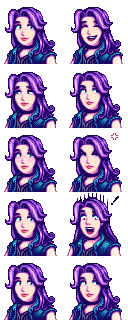
一个资源可能包含多个子画面或数据条目。例如:Portraits/Abigail:
因此,如果想更改阿比盖尔的肖像,则可以使用 Content Patcher 加载或编辑 Portraits/Abigail.
Load 和 Edit
可以通过两种概念上的方式来更改资源:
- Load the initial version of an asset. Each asset can only be loaded by one mod at the same time. This is mainly useful for total replacement mods (like a mod that completely changes an NPC's portraits), or to provide files that don't exist in the Content folder.
- Edit an asset after it's loaded. Any number of edits can be applied to the same asset.
For example, let's say the game needs Abigail's portraits. This is how changes are applied:
                                           ┌────────────┐
                                           │ edit asset │
                         ┌────────────┐    ├────────────┤
get Portraits/Abigail ──>│ load asset │───>│ edit asset │──> portrait asset
                         └────────────┘    ├────────────┤
                                           │ edit asset │
                                           └────────────┘
This is divided into four main action types (Load, EditData, EditImage, EditMap), which are explained in more detail in the Content Patcher readme (see below).
Get started
Intro to JSON
You'll notice a lot of files with .json at the end of the name when creating mods for Stardew Valley. That means they're formatted as JSON, which is just a way of writing text that's readable to code. If you haven't used JSON before, reading An Introduction to JSON first will be very helpful to understand what the files are doing.
Create example mod
First let's get our basic content pack up and running:
- Install SMAPI and Content Patcher.
- Unpack the game's Content folder so you can see what each asset contains (see Modding:Editing XNB files#Unpack game files).
- Create a SMAPI content pack.
- Create a content.json file in the same folder with this content:
{
   "Format": "2.0.0",
   "Changes": [
   ]
}
- Launch the game.
If you did everything correctly so far, you should see the new mod under "Loaded X content packs" in the SMAPI console. (If not, review the above steps or ask for help.)
Content format
The content.json file you created above is what tells Content Patcher what to change. This has two main fields:
- Format: the format version. You should always use the latest version (currently 1.19.0) to enable the latest features and avoid obsolete behavior.
- Changes: the changes you want to make. Each entry is called a patch, and describes a specific action to perform: replace this file, copy this image into the file, etc. You can list any number of patches.
You can list any number of patches in the Changes field, each surrounded by { and }. See the next section for more info, but here's a quick example:
{
   "Format": "2.0.0",
   "Changes": [
      {
         "Action": "Load",
         "Target": "Animals/Dinosaur",
         "FromFile": "assets/dinosaur.png"
      },

      {
         "Action": "EditImage",
         "Target": "Maps/springobjects",
         "FromFile": "assets/fish-object.png"
      },
   ]
}
(There are other fields like ConfigSchema and DynamicTokens for more advanced usage; these are covered in the full readme.)
Next steps
You've created a Content Patcher pack!
For help making it do something, see...
- Content Patcher readme for the full reference;
- video intro to Content Patcher (unofficial);
- intro to converting XNB mods (unofficial).
Examples
(We'll have a guided tutorial here soon.)
Change horse/pet icons
For edits to replace the look of horses and/or pets (cats and dogs), you can add these to your content.json in order to also replace the little head icon in the inventory menu:
For horses:
//horse head in inventory
{
   "Action": "EditImage",
   "Target": "LooseSprites/Cursors",
   "FromFile": "yourfile.png",
   "FromArea": { insert values here },
   "ToArea": { "X": 192, "Y": 192, "Width": 16, "Height": 16 }
}
For dogs:
//dog head in inventory

"ToArea": { "X": 208, "Y": 208, "Width": 16, "Height": 16 }, //Dog 1

"ToArea": { "X": 224, "Y": 208, "Width": 16, "Height": 16 }, //Dog 2

"ToArea": { "X": 240, "Y": 208, "Width": 16, "Height": 16 }, //Dog 3
For cats:
//cat head in inventory

"ToArea": { "X": 160, "Y": 208, "Width": 16, "Height": 16 }, //Cat 1

"ToArea": { "X": 176, "Y": 208, "Width": 16, "Height": 16 }, //Cat 2

"ToArea": { "X": 192, "Y": 208, "Width": 16, "Height": 16 }, //Cat 3
